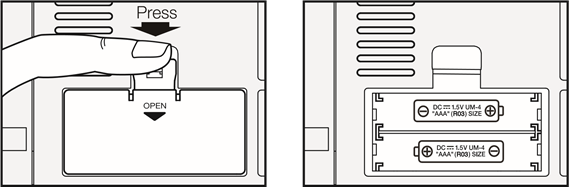
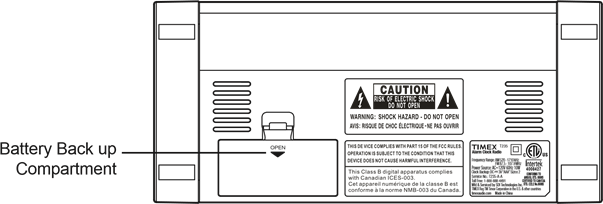
Your new Timex Clock Radio includes a battery back up system that will maintain the time and alarm settings during a temporary power interruption. The battery back up system requires two "AAA" batteries, not included. We recommend you use a well-known brand of alkaline batteries for longest life and best performance. If you experience a power failure while batteries are installed, the display will turn 'off' but the clock will continue to run and maintain your alarm settings. When power is restored the display will turn 'on' again and the time and alarm settings will be correct.
This clock radio has four silicon rubber feet on the bottom cabinet to prevent the radio from sliding and to avoid scratching your furniture. These rubber feet are designed not to leave marks on furniture. However the use of certain furniture polishes could cause the rubber feet to soften and stick to your furniture. If this radio is going to be placed on fine, highly polished wooden furniture, you should place small self-adhesive felt pads on the rubber feet, or place a cloth between the radio and the surface of the furniture.
This model is equipped with a polarized AC power plug that has one wide blade and one narrow blade. This plug will only fit in a polarized AC outlet. This is a safety feature designed to prevent electric shock. Do not try to defeat this safety feature by filing the wider blade or using an adapter to make this plug fit in a non-polarized outlet. If this plug will not fit in your outlet you should have your outlet changed by a qualified electrician.
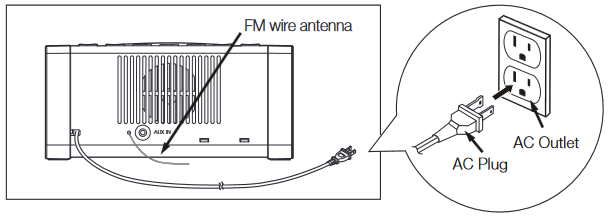
Unwind the FM wire antenna, located on the back cabinet, and extend it to its full length for best FM reception.
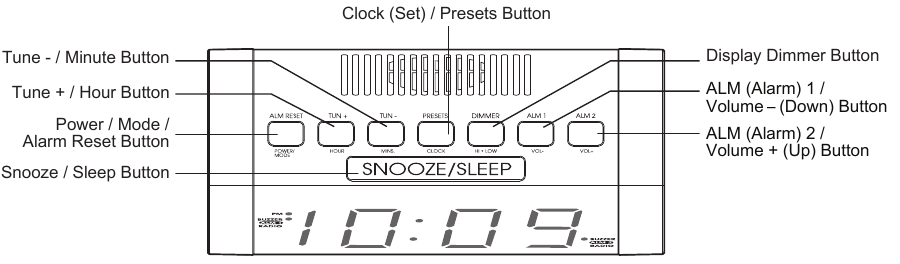
POWER/MODE (ALM RESET) Button – Press to turn the radio 'on', to select FM, AM or AUX modes. Press and hold to turn the radio 'off' again. When the alarm is sounding press to stop the alarm and reset it for the following day.
TUN + (HOUR) Button – During radio operation press to tune the radio to a higher frequency. When radio is off, press to adjust the Hours display during time or alarm adjustments.
TUN – (MINS) Button – During radio operation press to tune the radio to a lower frequency. When radio is off, press to adjust the Minutes display during time or alarm adjustments.
CLOCK (PRESETS) Button – When Radio is 'Off' press and hold to enter clock setting mode. When Radio is 'ON" press to store or recall a preset memory station.
DIMMER (HI/LO) Button – Press to switch the display brightness between the High and Low settings.
ALM 1 (VOL - ) Button – When Radio is 'Off" press and hold to enter Alarm 1 setting mode. When Radio is 'On' press to lower volume level.
ALM 2 (VOL + ) Button – When Radio is 'Off' press and hold to enter the Alarm 2 setting mode. When Radio is 'On' press to increase volume level.
SNOOZE (SLEEP) Button – When either alarm is sounding press to stop the alarm temporarily. After 9 minutes the alarm turns on again. When alarm is not sounding, press to activate the SLEEP timer and to adjust the sleep timer duration between 90 minutes and 10 minutes before auto shutoff.
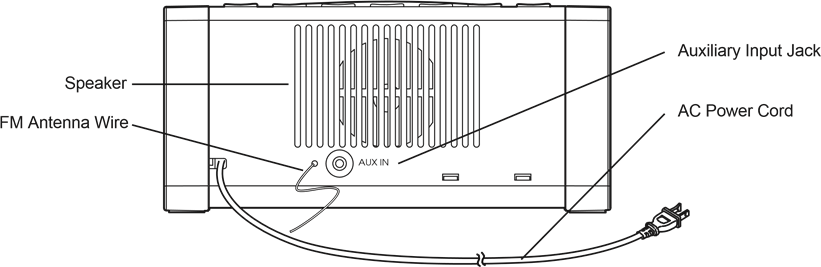
Unwind the FM wire antenna and extend it to its full length.
Unwind the AC power cord completely and insert the plug into a 120V/60Hz AC outlet. Use an outlet that is always 'live'. Do not use an outlet that is controlled by a wall switch.
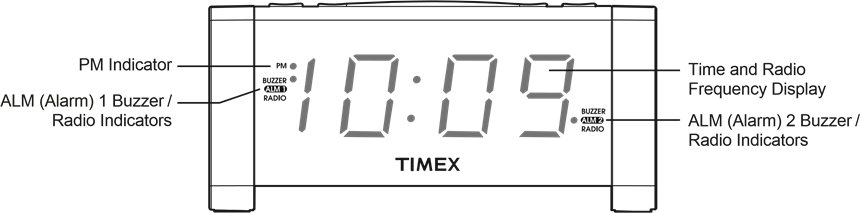
When the clock is connected to the AC outlet for the first time the display will turn on and begin flashing "12:00 (PM)".
NOTE: The time can only be set when the clock radio is in the OFF mode. If the radio is playing, press and hold the POWER/MODE button until the display briefly shows 'OFF' and then reverts to the time.
This Timex clock radio has dual alarms that can be set and used independently. The initial default alarm settings are 6:00 AM for Alarm 1 and 7:00 AM for Alarm 2. The procedure for setting both alarms is the same.
NOTE: The alarm times can only be adjusted when the clock radio is in the OFF mode. If the radio is playing, press and hold the POWER/MODE button until the display briefly shows 'OFF' and then reverts to the time.
NOTE: You must make the time and alarm time adjustments while the display is flashing. If no adjustments are made for approximately 8 seconds the display will stop flashing and cannot be adjusted. If this occurs you must start the time and alarm setting procedure again and make sure that you complete the adjustments while the display is flashing.
POWER/MODE Button – When the unit is 'off' press the POWER/MODE button repeatedly to select the following operating modes:
First Press – FM Radio band. The initial default display is 87.5 mHz.
Second Press – AM Radio band. The initial default display is 520 kHz. Third Press – AUX (AUH) mode. To listen to an external audio source.
The tuner remembers the last FM and AM station that you were listening to and automatically returns to those stations the next time you select the FM or AM mode.
The tuner can store up to 10 FM and 10 AM station in memory for easy recall. To store a station in memory:
Tune to the desired band and then press the PRESETS button to scroll through the 10 preset memories to find your desired station.
When the alarm is sounding press the SNOOZE/SLEEP button to stop the alarm temporarily for a few minutes extra sleep. The alarm will turn on again after 9 minutes. You may repeat the Snooze operation several times within one hour, but after one hour the alarm will not turn on again and will reset itself for the following day.
When the alarm is not sounding press the SNOOZE/SLEEP button to activate the Sleep to radio timer. The radio will turn on to the last tuned station and the display will show "90" indicating that the radio will play for 90 minutes before auto shutoff. To adjust the amount of sleep time, continue pressing the SNOOZE/SLEEP button to reduce the amount of time by 10 minutes with each press. When the Sleep timer counts down to "00" the radio shuts off automatically. To shut the radio off at any time press the POWER/MODE button.
You may adjust the radio volume level during sleep timer operation.
By default the display brightness is set to the Hi level at our factory. Press the DIMMER button once to reduce the display brightness to a low level. Press again to return to full brightness.
You can listen to music from an external source such as an iPod, MP3 player, CD player, etc, through the speaker of your Timex clock radio. Use a 3.5mm stereo audio cable (not included) to connect the headphone jack of your external source to the AUX IN jack on the back panel of your Timex clock radio.
Press the POWER/MODE button on the radio until the display shows "AUH". Begin playback on your external device. Adjust the volume level of the clock radio as desired. You may need to adjust the volume level on your external device as well.
When you are finished listening press and hold the POWER/MODE button until the display shows OFF. Don't forget to turn off your external device as well.
Good quality alkaline batteries should last for at least one year under normal conditions. When you decide to change the batteries, leave the clock radio connected to the AC outlet to avoid having to reset the time, alarm times, and radio preset station memories.
If you experience a power failure and the back up batteries are exhausted, the display will begin flashing when the power is restored. If you notice the flashing display you should first remove the exhausted batteries, install fresh batteries, and then reset the time, alarm times, and preset station memories as described in this manual.
If the cabinet becomes dusty wipe with a soft, dry dust cloth. Never spray the cabinet with furniture dusting sprays. If the cabinet becomes dirty or smudged with fingerprints, wipe it with a soft cloth slightly dampened with a mild soap and water solution. Never use chemicals or abrasive cleaners. Never allow water or any other liquid to enter the cabinet.
There are no user serviceable parts inside this unit. To avoid the potential for electric shock never open the cabinet yourself. Refer all service problems to a qualified service technician at a factory authorized service center. Consult your warranty for more details.

Here you can download full pdf version of manual, it may contain additional safety instructions, warranty information, FCC rules, etc.